#HackArt

by Eduard Muntaner-Perich

Here I share my personal explorations on creating learning experiences that mix Creative Computing and Art.

April 11, 2022

Animating a visual poem by Joan Brossa with Scratch


In this simple activity, I propose to bring to life a visual poem by Joan Brossa. The idea is to start from a static image (the poem) and create an animation from it with Scratch. The final effect is what you see above: an infinite cascade of letters coming out of a top hat. 

Check my Scratch project to see the scripts shared in this post and to create your own remixes.

The first step is to delete all the unnecessary elements from the original image, and then add the edited image as a background in a new Scratch project. Or you could also do the image edition with the graphic editor in Scratch.

To create the animation, although as you can see there are many letters, we will use only one sprite, since we will use clones. We need only one sprite with 26 costumes: each one of the letters. We can create it ourselves (drawing the letters or downloading them from the Internet) or you can reuse the one I created (remixing my project or dragging my sprite to your Scratch backpack). 

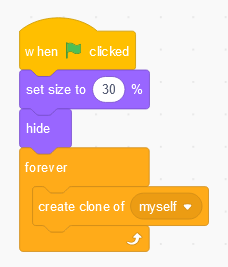
Once this is done, we have to adjust the size of the character, that is, reduce the letters to a size that makes them look like they can come out of the hat. And we create a main script that simply hides the sprite and forever creates clones of itself.


And now comes the most complex part: making the clones appear inside the hat and fall towards the lower edge following oblique trajectories. To do this, each time a clone starts, we place it in a random but well delimited position (inside the hat). Then we simply use the glide block to make it fall. It is very important that we eliminate the clone when it reaches the bottom. In this way we will never reach the maximum number of clones, and we can continue creating new ones, achieving the effect of a perpetual cascade.

Optionally, if we want the letters to rotate as they fall, we can use parallelism, and create another script that starts with the block "when I start as a clone".

Reimagine

This is an example with a specific visual poem. You can explore other poems by Brossa or other poets, and imagine how we could bring them to life.

You can also create your own visual poems, which is even better!

Add music, create interactivity... let your imagination run wild!


August 25, 2021

My contributions to the Scratch Conference 2021

At the last Scratch Conference, which was virtual due to the pandemic, I shared a couple of videos that I also take the opportunity to share in this blog.

The first one is a summary of the Hack your window activity, explaining how the idea was born, how the initiative went viral, and also contains a small tutorial for those who want to create and share a Scratch project with their window.

The second video is a proposal with ideas for projects that mix visual poems, poetry installations and creative coding with Scratch and Makey Makey.


October 19, 2020

Hacking public art with Scratch


In 2018, I conducted a workshop on hacking public art at the Scratch@MIT Conference. Since then, I had pending to prepare this tutorial. In fact, rather than a tutorial, this is more like a set of suggestions, tips and indications, because the activity, as you will see, can be approached in many ways, and is totally open to variations.

The idea is very simple, and consists of using creative coding to play with the art that we have in our surroundings.

 
Try this Scratch project with 3 examples.

The activity can be performed with children, adults, families, and is also perfect for teacher training. It is interesting because it allows us to work outdoors, work in teams, improve our coding skills, and learn from the art we have around us, which we may see every day, but to which we often don't pay enough attention.

The main idea is to take a walk with our team, choose public artworks that we would like to play with, think together about what we could do, and finally program it with Scratch. We can code outdoors, with laptops or mobile devices, or we can first take the pictures outdoors and then go code in the classroom, home, museum, etc.


With the Scratch graphic editor we can make many effects, and for many animations it is more than enough. But sometimes it is useful to know that there are free online graphic editors, which allow us to play with the photos in many more ways. Sometimes these are useful to prepare the photos before uploading them to Scratch. I recommend Photopea and Pixlr, which are very intuitive.

Ideas and things you could try:

1. Adding elements from another context

2. Bringing to life a sculpture or painting

3. Duplicate elements and play with them


You can find inspiration in the projects of this Scratch studio, and I invite you to add your owns there.

Also, I share a step-by-step to learn how to create a project like the first one in this post (where the Scratch cat replaces the Botero cat).

Step 1: We take the photo of the sculpture, we upload it and use it as a backdrop in Scratch. 

Step 2: We open the same image again but as a sprite. Then we have to cut out the body of the statue (we won't need its head) and we can change its color to make it more similar to the orange color of the Scratch cat. 

Step 3: Now we have to edit the Scratch cat sprite, remove its body with the graphics editor, select the head and copy it, return to the statue's sprite, paste the head and adjust it (orientation and size).

Step 4: Finally we only have to program the animation. First we make the sprite totally transparent (set ghost effect to 100), and we set the size and position that it has to have to be right over the cat statue in the background. Then, we wait as long as we want and with a loop we make it appear slowly (decreasing the ghost effect in each iteration).


March 19, 2020

Hack your window with Scratch. Family creative learning activity

Update (April 7th, 2020): Check the Hack Your Window studio to see lots of examples that people are sharing. I'm sure they'll give you ideas! You can also watch this videotutorial by Frank Sabaté (it's in Catalan but very visual!) where the idea is explained step by step.

Update (April 14th, 2020): Here a videotutorial in English by El Rincón de Primaria.
Now that, because of the confinement due to the COVID19, we look at the world from the window, I propose a family creative learning activity with Scratch.

Take a picture of a window at home, and using Scratch, turn it into a computer game, or into an animated story, an art project, etc. The possibilities are endless, you just have to imagine.

I'm going to share three examples and give you some advice.

Example 1:


Example 2:


Example 3:


Okay, this is very cool, but how do we do it?

If this is the first time you've heard of Scratch, visit the site, register, click "Create", and start exploring a little. You can do some of the tutorials that the website itself will propose, and you'll see that it's very simple!

If you already know a bit about Scratch, here I share with you some very simple steps to turn a picture of a window into a digital animation. But these are just examples, let your imagination fly!

1. We have already taken the picture. Now what?

Go to Scratch, create a new project, and add your photo as a new sprite from your computer. Now, go to "costumes", and with the paint editor you can modify the photo, for example we can cut out the inside part of the window, to make things happen inside. Then you can program this sprite to center it and send it to the front (so the other sprites will pass behind).


2. We add a stage and other sprites

In this example we have emptied the inside part of the window, and now we can put in some more beautiful views. We could use a photo of us, a drawing, a landscape from Internet, etc. Add it to the Scratch project as a stage, then add other sprites! In this example I added two birds and a wizard.


3. Create your game or story

When you have all the elements, now comes the really fun part: explore how to program them to make things happen in your project. For example, make the sprites move, talk, draw... Don't be afraid of making mistakes! For example, my birds move like this:

Important: when you finish your project, share it on the Scratch website, and then add it to this studio, so we can see it, and your project can inspire others.

And if you share it on social networks, please use the hashtags
#HackYourWindow i #ScratchAtHome.


Hackea tu ventana con Scratch. Actividad creativa en familia

Ahora que, debido al confinamiento por el COVID19, nos miramos el mundo desde la ventana, os propongo una actividad familiar creativa con Scratch.

Haced una foto de una ventana de casa, y utilizando Scratch, convertidla en un videojuego, o en una historia animada, un proyecto artístico, etc. Las posibilidades son infinitas, sólo hay que echarle imaginación.

Os comparto tres ejemplos y os doy unos consejos.

Ejemplo 1:


Ejemplo 2:


Ejemplo 3:


De acuerdo, esto es muy guay, pero como lo hacemos?

Si es la primera vez que oís hablar de Scratch, visitad la web, registraros, haced clic en "Crear", y empezad a explorar un poco. Podéis hacer alguno de los tutoriales que la misma web os propondrá. ¡Ya veréis que es muy sencillo!

Si ya conocéis un poco Scratch, aquí os comparto unos pasos muy sencillos para convertir una fotografía de una ventana en una animación digital. ¡Pero sólo son ejemplos, haced volar vuestra imaginación!

1. Ya hemos hecho la foto. Y ahora qué?

Id a Scratch, cread un proyecto nuevo, y añadid vuestra foto como un nuevo personaje desde vuestro ordenador. Ahora, id a "disfraces", y con el editor de dibujo podéis modificar la foto, por ejemplo podemos recortar la parte interior de la ventana, para poder hacer que pasen cosas dentro. Después podéis programar este personaje para centrarlo y enviarlo al frente (así los otros personajes pasarán por detrás).


2. Añadimos un escenario y otros personajes

En este ejemplo hemos vaciado la ventana, y ahora podemos poner unas vistas más bonitas. Podríamos utilizar una foto nuestra, un dibujo, un paisaje de internet, etc. Añadidla al proyecto Scratch como escenario. ¡Después añadid otros personajes! En este ejemplo yo he añadido dos pájaros y un mago.


3. Crea tu juego o historia

Cuando ya tenéis todos los elementos que queríais, ahora viene lo más divertido: explorad cómo programarlos para hacer que pasen cosas en vuestro proyecto. Por ejemplo haced que los personajes se muevan, que hablen, que dibujen... ¡No tengáis miedo a equivocaros! Por ejemplo, mis pájaros se mueven así:


Importante: cuando hayáis terminado vuestro proyecto, compartidlo en la web de Scratch, y luego añadidlo a esta galería, así los podremos ir viendo, y vuestro proyecto podrá inspirar a otros.

Y si lo compartís por redes sociales, utilizad los hashtags #HackYourWindow i #ScratchAtHome.